
 – Trailer")

 – Trailer")
 – Trailer")
")
 – Trailer")
 – Trailer")
 – Trailer")
 – Trailer")


")
")


")


How To Install Pi-Hole On Raspberry Pi

This post contains affiliate links and we may earn a commission ( No Cost To You ) when you click and make a purchase using the affiliate links, This will help with costs and maybe buy a beer some day 🙂 Disclaimer.
What Is Pi-Hole ?
Pi-Hole is a network-wide ad blocker. In a typical home, this can cut out almost all ads to all devices in your home, without having to install an ad blocker on every single device. using your home router and connecting the home router to the raspberry pi-hole system, we will talk you through and show you how to do this in this guide.
Nothing you can add to a network is 100% ad blocking but pi-hole is as good as most gets and requires very little customising after being setup it can be set to update automatically itself after being setup to how you want it.
Some of Pi Hole’s features:
- It’s Free!!! All you need is a PI4 to run Pi-Hole on – Raspberry Pi.
- No client-side ad block software required.
- Thousands of ad-serving domains blocked with the default blocklists. There are a number of publicly available blocklists.
- Blocks ads on any device, including those Smart TVs and other devices that do not allow you to make any modifications. Exception is devices with hardcoded DNS.
- Reduces bandwidth and improves overall network performance.
- Provides a dashboard to monitor various stats on ad blocking. Pi-Hole has a built-in web server that provides an easy to use Web interface for administration.
What we need ? (basic)
- Raspberry PI Imager ( Software )
- Raspberry pi4 ( 2GB Model should be more than enough )
- SD Card ( 16GB ) 4GB can be used but 8GB Recommended
- Raspberry PI4 Cooling ( cheaper options available but buy once we say )
- Raspberry PI4 Power Supply
- Raspberry PI4 Case
- Network Cable (Cheaper ones can be used but better to buy once)
Take a look at what you can do on a Raspberry Pi4
Let’s get started:
We are assuming you have everything in the list above so let’s get to it, and start setting up our own fully customisable recursive DNS server and Ad-Blocker.
Step 1: Download and install Raspberry Pi Imager
Step 2: Start Raspberry Pi Imager software

Step 3: Click on CHOOSE OS
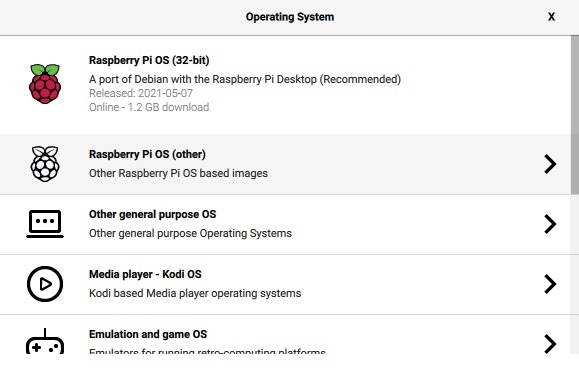
Step 4: Click on Raspberry Pi OS (other)
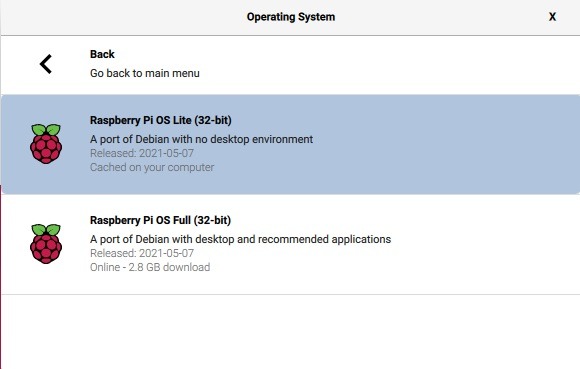
Step 5: Click on Raspberry PI OS Lite (32-bit)
Step 6: Plug in your SD CARD to your computer ( using SD Reader adapter or SD Card USB adapter )
Step 7: Click on CHOOSE STORAGE
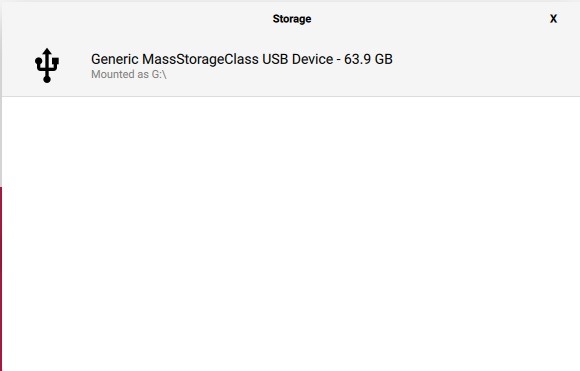
Step 8: Now you should see your SD CARD in the list Click on it ( to select it )
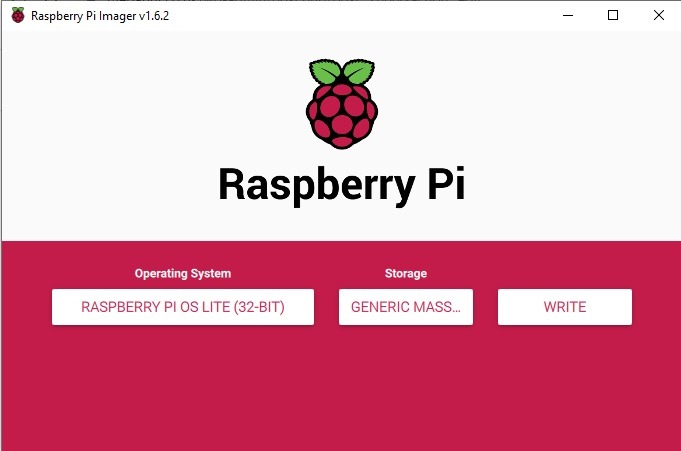
Step 9: Now your Raspberry Pi Imager should look like the above (picture) you are now ready to click on WRITE
Now go make a drink ( tea or coffee ) and let it do it’s thing, it will let you know when it’s finished.
Step 10: Now the Raspberry Pi Imager has formatted and flashed the image we need to your SD CARD Don’t do nothing yet as we need to add a file to it so we can enable ssh at boot, Just unplug your SD CARD and plug it back in.
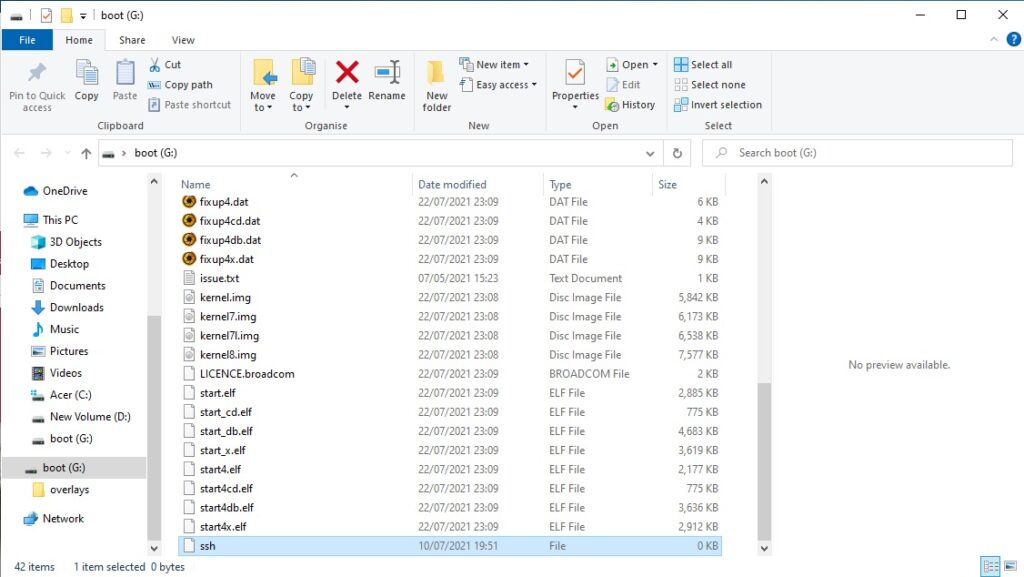
Step 11: Now we need to create a file called ssh with NO extension on it if yours has .txt or anything else at the end of ssh rename it and delete .txt or what ever else is on the end of the name, on Windows 10 on your SD CARD boot partition at the top click on view then check file extension is selected ( as pictured below ).

The above method will ensure that there is now extension name to your file as this will NOT work if there is, notice the other files in the boot section have their extensions but our ssh file does NOT, we need this for it to work, Windows hides name extensions by default.
Step 12: Get you Raspberry Pi4 ready We assume you have put your Raspberry Pi4 in it’s case, Lets connect everything except for the power supply you need your network cable connected from your home router to the Pi4 that’s it plug the power supply into the wall but not the Pi4
Step 13: Now that you have done all the above steps correctly you should now be ready to remove the SD CARD from your computer and put it in your Raspberry Pi4 and plugin the Power Supply and let it boot up.
Step 14: We need to find our raspberry pi’s IP Address so we can ssh to it.
Step 15: you need to open your routers Web UI ( User Interface ) go to your routers ip address this is easy to find, Open a command prompt click your search glass bottom left and type: cmd and select Command Prompt
Step 16: in your command prompt type: ipconfig ( if your using a linux computer it’s ifconfig ) and the cmd is called terminal, this should give you your ip address and more the bit you need is: default gateway this is the ip address to your home router when you have this type it into your address bar in your web browser it should ask you for a username and password to login, if you haven’t changed it to your own setup then these can usually be found on a sticker on your home router get your details and login to your home router.
Now you have logged in you need to look at connected devices all routers are different so there is no 1 way to tell you how to find them but click in the menu lists and find a list of connected devices when you find it your raspberrypi will broadcast it’s host name as: raspberrypi and to the side of the name your should see the ip address it has been given by your home router.
Step 17: Remember our Command prompt in Step 15 we now need that again ( windows 10 and up only ) if you are on a windows below 10 you will need a ssh program like Putty << Click to open putty official page and download putty.
!!!! DO NOT DOWNLOAD SOFTWARE FROM ANYWHERE EXCEPT OFFICIAL SITES !!!
Step 18: Open the command prompt ( cmd ) now we need to type: ssh pi@your pi ip address ( Replace your pi ip address with your pi’s ip address that you got from your router example below) then hit enter
Example: ssh [email protected]
Step 19: Now it will ask you for the password to your pi login, by default it is: raspberry
Now you have to accept type: yes or Y and hit enter, that’s it you are now logged into your raspberry pi through ssh and we can do almost anything we like from here while logged in.
Step 20:
The FIRST THING ANYONE SHOULD DO AFTER SUCCESSFUL FIRST LOGIN TO THEIR RASPBERRY PI IS CHANGE THE DEFAULT PASSWORD AND WE ARE GOING TO SHOW YOU HOW.
in the ssh window we logged into our raspberry pi type: passwd No it’s not a typo, hit enter it will ask you for the current password: raspberry remember type it and hit enter now it will ask you to enter the new password you want to set it up as, MAKE IT SOMETHING EASY FOR YOU TO REMEMBER if you forget it and cannot login again then you will be back at the start of this guide and doing everything over from the beginning.
type your new password in and hit enter it will ask you twice for the same password so it can check the password it correct and matches,
NOW remember when you close the ssh command prompt and you go to login again the password will have changed also to login to the new password you chose, so ssh [email protected] enter then it will ask for your password this is the new password you setup above.
Step 21: now you have logged back in we need to do 1 main and very important thing and that’s make sure everything is up to date, in the ssh window type in the code below:
sudo apt update && sudo apt upgrade -y && sudo apt autoremove -y
Explanation: sudo apt update will update your raspberry pi source lists, sudo apt upgrade will update all the outdated files on your raspberry pi, sudo apt autoremove will remove any apps that are no longer required by the system or dependancies of other apps on your pi4, the && will tell the pi once to command before it has completed to move on the the next command and the -y tells your pi4 system that if there are any updates to download then you want it to download without having to manually type yes or y to download as it goes through that command process.
Now once you enter the above command go make a drink ( tea or coffee ) it will take a while to complete as different versions of the pi will complete at different speed due to system speed and cpu including ram speeds.
Example: Raspberry Pi zero W compared to Raspberry pi4
Raspberry pi zero w might complete the above command in 10-15 minutes depending on how many updates there are.
Raspberry pi4 might complete the above command in 5-8 minutes again depending on how many updates and what updates are needed
Now we have complete the system updates we need to reboot the raspberry pi all we need to do is type:
sudo reboot
hit enter and the raspberry pi will disconnect your ssh connection and reboot give it around 60 seconds and you can ssh back into the raspberry pi to complete this guide.
Now we have setup and updated our raspberry pi we can continue with this guide
To start the pi-hole setup ssh back into our raspberry pi then type and hit enter the code below
curl -sSL https://install.pi-hole.net | bash
after typing the above command hit enter and follow the instructions on setting it up.
highlight OK and hit enter
highlight OK and hit enter
highlight OK and hit enter
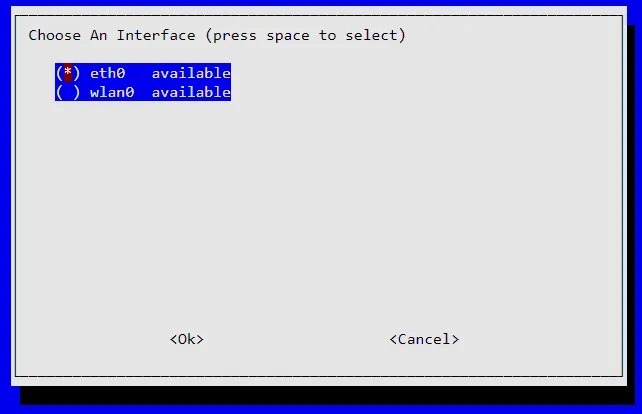
Make sure there is a star in the eth0 option as this is the pi4’s ethernet adapter at that your network cable is plugged into using your Tab button to the left of your keyboard tap it until ok is highlighted and hit enter for the next option.
In the next screen select your preferred dns provider our choice is Level 3 but you can choose what you prefer.
In the next screen just make sure Steve’s list is an option and selected with a star in the box and select OK.
In the next screen Select your preferred protocols defaults are usually fine select ok and hit enter.
in the next screen select ok if your ip address and default gateway are correct.
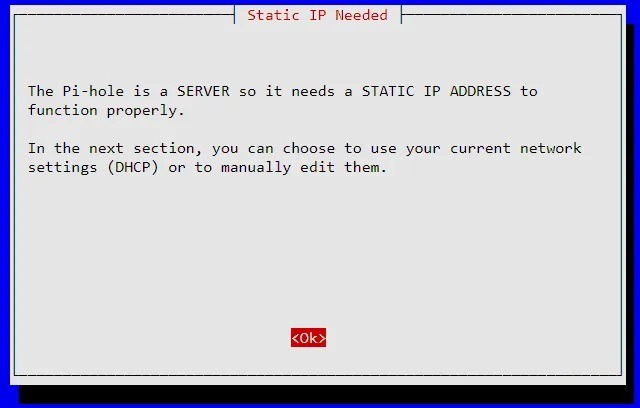
Next, you will see a warning on IP conflict in case Pi Hole receives the same IP address as another device on your network. With modern routers, this should be rare to happen.
On the next few screens all the default options are fine and on the last screen it will give you instructions on how to go to the pi-hole web (UI) and login and it will create you a random password for you to login with you can use this or create your own password.
To create your own password for login you should be in the ssh window now after the installing of pi-hole with a text of your pi’s ip address and the random password it created to change the password type the command below and create your own password to login.
pihole -a -p
The above command will tell pi-hole that you want a different password and once typed hit enter and it will ask you for a new password that you want to use, the above command can also be used in the future if you forget the password.
Once you have set a new password all you have to do is in your web browser IE, chrome, internet explorer, firefox or so on in the address bar enter: http://your pi’s ip address/admin and hit enter and the pi-holes web (UI) should show up just enter the password that was random generated or the password you changed it to with the above command tick save for 7 days and hit login and your done you now have a default setup of the pi-hole ad blocker.
Now all you need to to is on each device that you want using the pi-hole to block ads is change the devices network dns to the ip address of your raspberry pi’s ip address
The following instructions are for windows 10 desktop/Laptop dns change
Click little magnifying glass bottom left of your screen and type in the search: wifi settings
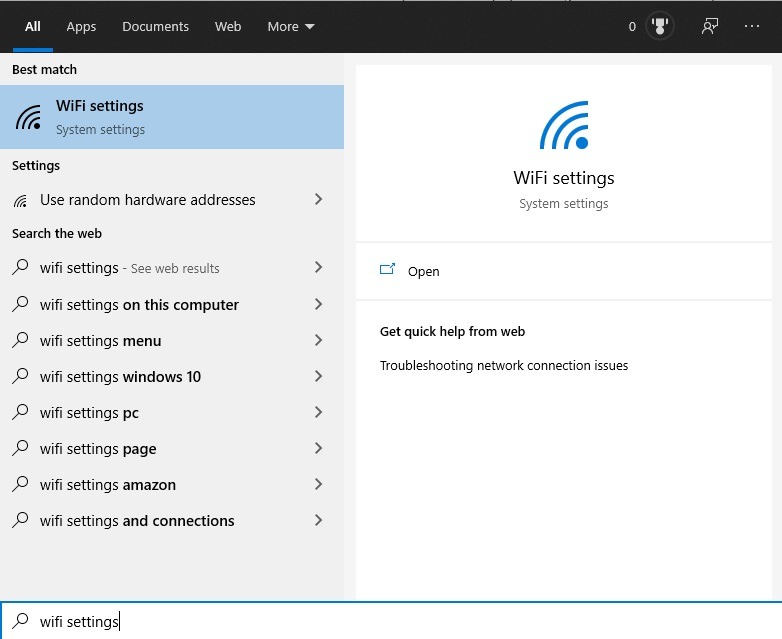
Click on WiFi Settings under Best match
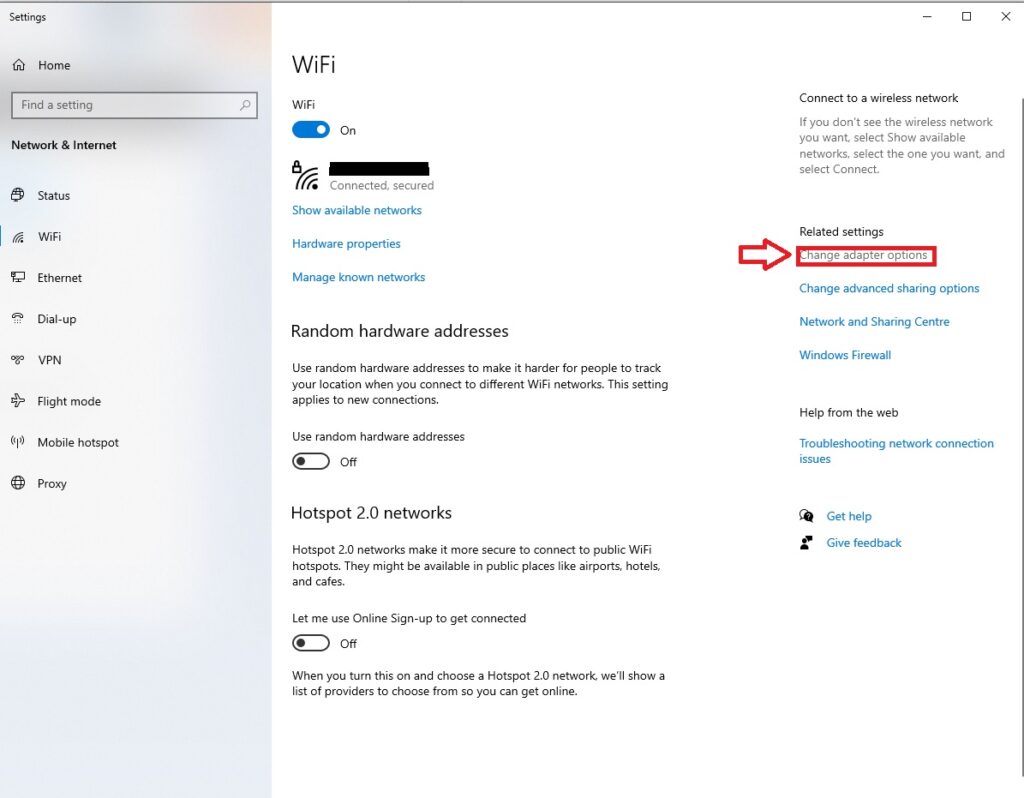
In the wifi settings screen under related settings click Change adapter options
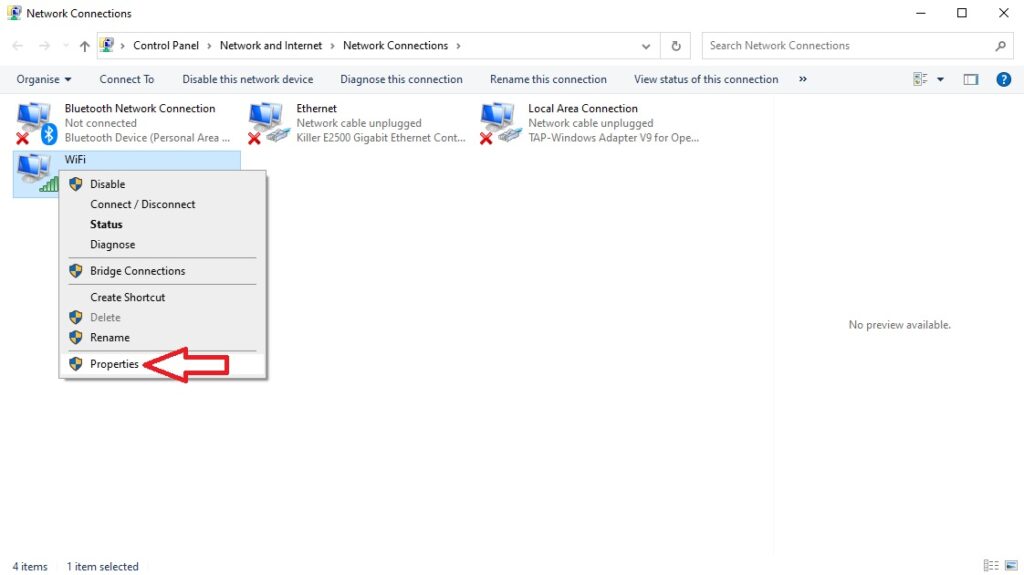
Now highlight either your wifi adapter or ethernet adapter as above and right click it to select properties
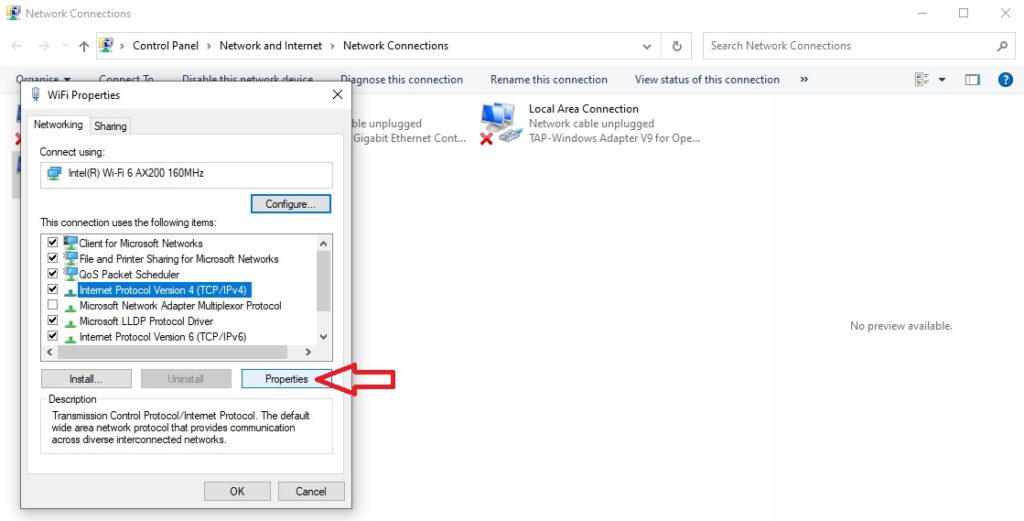
Now click to highlight internet protocol version 4(TCP/IPv4) then click properties
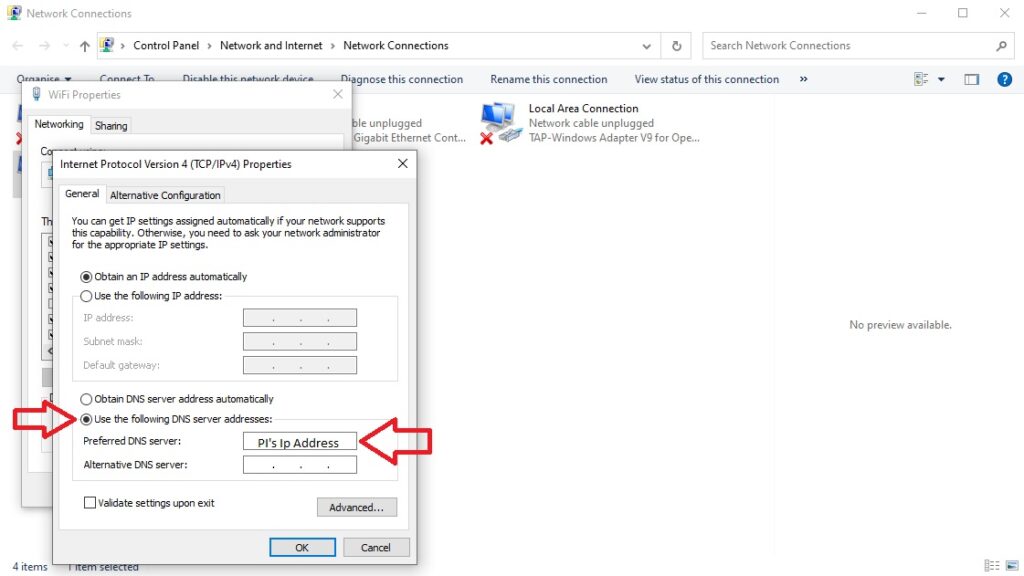
Now select Use the following dns server address and enter the ip address of your raspberry pi4 then click ok and you are done your computer will now change it’s dns server to your raspberry pi and you should start seeing activity in you browser on the pi-hole admin page all ads that are being blocked now by your pi-holes default steve’s block list is now being blocked on your pc/laptop.
There are so many other lists out there that can be added to your pi4 to help more and keep up to date and we will walk through this in another guide. we have tried to explain as much as we think you will need to know to get through this guide with 100% success.
If there is anything you think we missed leave a comment below and we will correct or update this guide the more we add to it or for it.
You should now be logged in and looking a little like the below picture ( we are using the Dark theme ) yours on default will be white background How to change Themes also check out How to change Pi-Hole DNS

Happy surfing with less ads.


 – Trailer")
")


 – Trailer")
 – Trailer")
 – Trailer")
Leave a Response